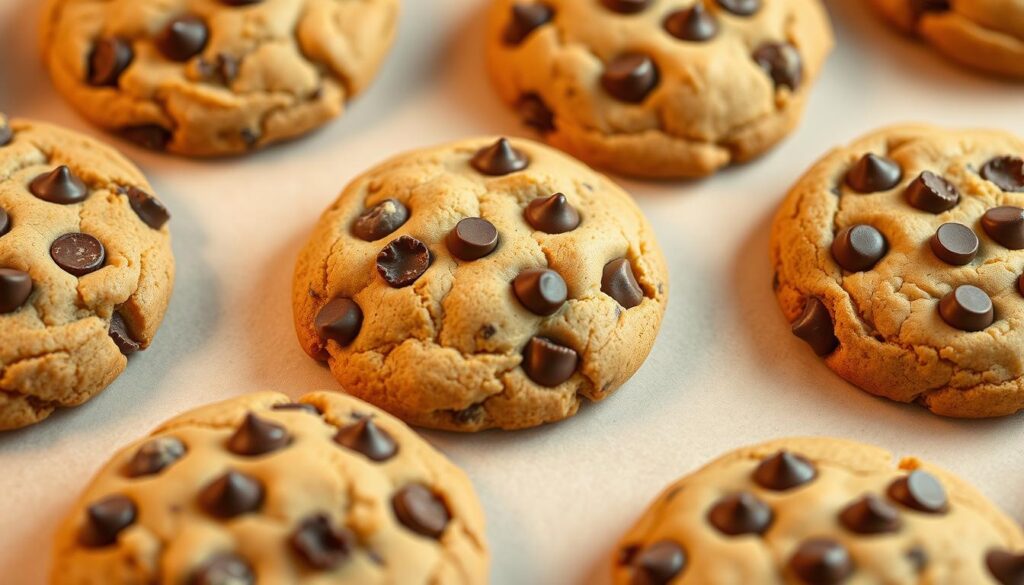
Imagine walking through Disney’s Grand Floridian Resort. The sweet smell of chocolate chip cookies fills the air. I’ve always been curious about the magical recipes behind Disney’s treats. Today, I’m excited to share an authentic Disney chocolate chip cookie recipe with you. It comes with precise metric measurements for perfect baking every time.
Baking is both science and art. These Disney chocolate chip cookie recipe metric measurements will help you make enchanting cookies. Whether you’re a precise baker or just love making treats, this recipe will guide you. You’ll create cookies that taste like they’ve been made in the happiest place on earth.
Key Takeaways
- Learn authentic Disney baking instructions
- Master precise metric measurements for consistent results
- Create bakery-quality chocolate chip cookies at home
- Understand the importance of ingredient precision
- Discover the magic of Disney-inspired baking
Introduction to Disney’s Chocolate Chip Cookies
Exploring the world of Disney snacks starts with the famous chocolate chip cookies. These treats have been a hit with visitors for years. They show Disney’s skill in making desserts that bring happiness to people all over the world.

The story of these beloved cookies is part of Disney’s long history of food. Disney’s Grand Floridian Resort is known for making the perfect cookie. It’s a favorite memory for many who visit.
A Magical Culinary Tradition
Disney’s desserts are more than just food. They’re an experience that combines:
- Precise ingredient selection
- Meticulous baking techniques
- A touch of Disney magic
What Makes This Recipe Extraordinary
The special thing about these cookies is their unique taste. They have crispy edges and a soft center. Now, you can make this magic at with easy-to-follow metric measurements.
| Characteristic | Description |
|---|---|
| Texture | Crispy edges, chewy center |
| Flavor Profile | Rich chocolate, balanced sweetness |
| Unique Element | Precision through metric measurements |
Whether you love Disney or baking, this recipe will take you to a magical place. Enjoy every bite.
Ingredients You’ll Need for the Perfect Cookies
Making magical Disney-style chocolate chip cookies begins with the right ingredients. After baking over 400 cookies, I found the perfect mix for delicious results every time.

Knowing your ingredients list is key for great cookie nutrition. Let’s look at the essential parts that make these cookies special:
Key Ingredients and Their Functions
- Flour Blend: 1 cup all-purpose flour + 1 cup unbleached bread flour for the best texture
- Butter: ½ cup (1 stick) unsalted butter, melted and cooled for 20 minutes
- Sugars:
- 1¼ cups dark brown sugar (packed)
- 1 cup granulated sugar
- Eggs: 2 large eggs for binding and richness
- Vanilla Extract: 1 tablespoon for extra flavor
Optional Ingredients for Extra Flavor
Want to make your cookies even better? Try these exciting add-ins:
- Chopped macadamia nuts
- Different chocolate chip varieties
- Caramel or coconut extract
- Espresso powder for depth
By choosing and measuring each ingredient carefully, you’ll make cookies that taste amazing and are good for you. The recipe makes about 3 dozen cookies that will impress everyone!
Metric Measurements for Accurate Baking
Precision is key to making great baking even better. It’s what turns good treats into magical Disney ones. Using the right disney chocolate chip cookie recipe metric measurements is vital.
Professional bakers swear by weight measurements for consistent results. Unlike volume, which can change, metric measurements give you perfect cookies every time.
Why Metric Measurements Matter
- Eliminates measurement variations
- Provides exact ingredient proportions
- Creates consistent baking results
- Enables precise recipe replication
Conversion Guide: Cups to Grams
Here’s a quick guide to help you with our disney chocolate chip cookie recipe. These metric conversions will help you get bakery-quality results:
| Ingredient | Volume Measurement | Metric Measurement |
|---|---|---|
| Unsalted Butter | 1/2 cup | 125g |
| Light Brown Sugar | 1/2 cup | 100g |
| White Sugar | 1/3 cup | 75g |
| Plain Flour | 2 1/2 cups | 300g |
Pro tip: Always use a digital kitchen scale for the most accurate baking instructions. This ensures your disney chocolate chip cookies turn out perfectly every single time!
“Baking is a science, and metric measurements are your most precise laboratory tools.” – Professional Baker’s Wisdom
Preparing the Dough: Step-by-Step
Making the perfect chocolate chip cookies needs focus and love for baking. I’ll show you how to make these tasty treats. They’ll make your kitchen smell amazing.

First, get all your ingredients ready and measure them carefully. This helps you get the same great results every time.
Mixing Dry Ingredients
Begin by mixing your dry ingredients in a medium bowl. You’ll need:
- 2 1/2 cups (310g) of all-purpose flour
- 1 teaspoon of baking soda
- 1/2 teaspoon of salt
Whisk these together until well mixed. This makes sure the leavening agents are spread evenly in your dough.
Creaming Butter and Sugars
Soft cookies start with creamed butter and sugars. Use butter at room temperature for the best results:
- 1 cup (230g) softened unsalted butter
- 1 cup (200g) granulated sugar
- 1/2 cup (100g) brown sugar
Pro tip: Cream the butter and sugars until light and fluffy. This takes about 3-4 minutes with an electric mixer.
Add eggs and vanilla extract slowly, mixing until just combined. Avoid over-mixing to prevent tough cookies. Then, gently mix in your dry ingredients and chocolate chips. Now, your dough is ready to make magical cookies.
Chilling the Dough for Best Results
Chilling the dough is key to making the perfect Disney chocolate chip cookie. It can turn your baking from good to amazing. Chilling the dough improves both the texture and flavor of your cookies.

Why Chilling Matters in Baking
Chilling cookie dough is not just a step to skip. It’s a game-changer for your cookies. Here’s what happens when you chill the dough:
- Flour fully hydrates, creating a more consistent texture
- Butter solidifies, preventing excessive spreading
- Flavors develop and become more complex
- Cookies maintain a better shape during baking
Recommended Chilling Times
For the best results with this Disney chocolate chip cookie recipe, follow this chilling plan:
| Chilling Duration | Expected Result |
|---|---|
| 30 minutes | Minimum recommended time for basic improvement |
| 4 hours | Optimal flavor development and texture |
| Overnight | Maximum flavor complexity and ideal cookie structure |
Pro tip: Even a quick 30-minute chill can improve your cookies. Remember, patience is key in creating the perfect Disney-inspired treat!
Baking the Cookies to Perfection
Now that you’ve mixed your Disney parks snacks-inspired chocolate chip cookie dough, it’s time to bake. Baking is key to getting that golden-brown cookie everyone loves.

Getting the baking just right is important. The right oven temperature and baking time can turn a good cookie into a great one.
Setting the Perfect Oven Temperature
For these Disney-inspired cookies, heat your oven to 330°F (165°C). This lower temperature helps bake the cookies evenly without burning the edges.
- Preheat oven to exactly 330°F
- Use an oven thermometer for accuracy
- Position rack in the center of the oven
Baking Time and Cookie Doneness
The baking time depends on how big you make your cookies. Here’s a quick guide to help you get it right:
| Cookie Size | Baking Time | Doneness Indicators |
|---|---|---|
| Medium Cookies | 12-14 minutes | Golden edges, soft center |
| Large Cookies | 15-16 minutes | Slightly darker edges, set center |
Pro tip: Cookies will set more as they cool. So, take them out when they look a bit underbaked for that chewy texture.
Each tray can hold 6 cookies. Baking two trays at once is efficient. You want cookies with crisp edges and a soft, chewy center that’s irresistible.
Customizing Your Cookie Recipe
Creating unique dessert recipes is all about personal creativity and exploring different flavor combinations. My favorite part of baking chocolate chip cookies is experimenting with unexpected add-ins. These add-ins transform the classic recipe into something extraordinary.
Let me share some exciting ways to customize your cookie nutrition and make these treats truly special:
Delicious Add-Ins for Extra Flavor
- Chopped nuts like pecans or walnuts for added crunch
- Mixed chocolate chips (dark, milk, white)
- Dried fruit such as cranberries or cherries
- Toasted coconut flakes
- Crushed pretzels for a salty twist
Alternative Dietary Options
For those with specific dietary needs, I’ve discovered some fantastic modifications to our classic Disney chocolate chip cookie recipe:
- Gluten-free flour blends for celiac-friendly cookies
- Vegan butter substitutes
- Almond or oat milk replacements
- Coconut sugar instead of traditional granulated sugar
Remember that ingredient substitutions might slightly change the texture and flavor. The key is to experiment and have fun creating your perfect cookie!
Pro tip: Start with small batches when trying new variations to find your ideal combination.
Storing and Freezing Cookies
Keeping the magic of your Disney chocolate chip cookie recipe alive is simple! Storing them right is key to keeping their taste and texture perfect.
Knowing how to store your cookies is vital. Here are my best tips for keeping them fresh:
- Store cookies in an airtight container at room temperature
- Keep cookies fresh for up to 5 days
- Add a slice of bread to the container to maintain moisture
Freezing for Long-Term Enjoyment
Freezing is a great way to enjoy your cookies for longer. Just follow these easy steps:
- Cool cookies completely after baking
- Place cookies in a freezer-safe container
- Separate layers with parchment paper
- Freeze for up to 2 months
Reviving Frozen Cookies
To enjoy your frozen cookies, thaw them at room temperature. For that fresh-baked feel, bake them at 350°F for 2-3 minutes. They’ll taste like they just came out of the oven!
Pro tip: Freezing cookie dough? Wrap it tightly in plastic wrap and put it in a freezer bag. This keeps your baking instructions perfect, even when you’re preparing ahead.
Serving Suggestions for a Magical Experience
Creating magical moments with disney parks snacks is more than just baking. It’s about the experience you create around them. I’ve found some fun ways to make these dessert recipes unforgettable. They’ll take you straight to the magic of Disney.
Perfect Beverage Pairings
When pairing your homemade cookies, try something new. My top picks are:
- Cold milk for a classic dunking experience
- Rich espresso for a grown-up twist
- Herbal tea for a subtle flavor
- Hot chocolate for a treat
Creative Party Serving Ideas
Make your disney parks snacks stand out with these ideas:
- Set up a cookie decorating station with toppings
- Use Mickey Mouse-shaped platters for serving
- Make cookie sundaes with vanilla ice cream
- Display cookies in a Disney park-like way
The magic is in the details. With a bit of creativity and Disney flair, your homemade treats can become unforgettable experiences!
Final Thoughts and Tips for Success
Baking is a mix of precision and passion. This Disney chocolate chip cookie recipe has been a hit, with over 21 million page views. It shows how important it is to follow the baking instructions closely.
When your cookies spread too much, chill the dough for 3-4 hours. Use a cookie scoop for even sizes. Remember, flour can vary from 130-140 grams per cup.
My favorite baking moments come from trying new things with this recipe. Freezing dough balls and trying different chocolate chips make each batch special. These cookies add a touch of Disney magic to any occasion. Feel free to make them your own, as the best recipes are those shared with love.
Troubleshooting Common Baking Issues
Watch for visual cues when baking. Cookies should be golden around the edges but soft in the center. If they’re too crisp, bake for a minute or two less.
Pro tip: let cookies rest on the baking sheet for 5 minutes before cooling. This helps them set perfectly.
My Favorite Cookie-Baking Memories
Baking these cookies has become a special tradition in my home. Each batch brings laughter, sweet smells, and joy. From freezing dough to trying new add-ins, these cookies are a delicious adventure to share.